So I did another account and I thought, okay, it's new year, 1432H and 2011 and this could be a rebranding step for my photography activities. I can look between my photos and pick the best and get rid of the tak jadi ones, as if there is anybody that cares to look at my Flickr, hahe. So I would like you to visit my new Flickr account by clicking here, however there are only a few photos there because I still need to arrange my photos in the disks. So do visit here whenever you are free ya. Thanks!

Showing posts with label photography 101. Show all posts
Showing posts with label photography 101. Show all posts
Tuesday, January 11, 2011
Photography 101: Nothing new, just a Flickr.
It has been some time since I last wrote an entry in English, which the English entries were mainly about photography. I did a Flickr account some time ago, but somehow I slipped the ID and the password from my mind (getting old already, but Dr Tuah Iskandar al-Haj would be mad if we blame ageing for forgetfulness, if you read his books) therefore I couldn't accessed my own Flickr account.
Saturday, January 1, 2011
Photography 101: Niat (Intentions)

Kali ini saya bukan hendak berbicara tentang aspek teknikal sesuatu fotografi, bukan juga aspek seni daripada segi komposisi, teknik editing atau sebagainya. Cuma mahu kita merenung kembali, apakah niat kita selama ini semasa kita melibatkan diri dalam fotografi ini. Adakah gambar-gambar yang kita compose and capture itu untuk menunjuk-nunjuk kehandalan kita bermain dengan kamera atau menunjukkan kecanggihan gears yang kita miliki?
Marilah kita sedar/insaf bahawa seni fotografi ni sebenarnya bertujuan untuk menunjukkan kebesaran ALLAH SWT yang Maha Kuasa. Biar orang yang melihat gambar-gambar yang kita tunjukkan itu sampai berkata "Oh, hebatnya!" Bukan tukang gambar tu yang hebat, tapi pujian itu kepada ALLAH SWT, oleh kerana gambar-gambar bunga, air terjun, embun, kucing, bayi dan sebagainya yang kita tangkap itu menzahirkan kekuasaan ciptaan ALLAH SWT. Kita cuma membantu menunjukkan apa yang sudah sedia dicipta oleh ALLAH SWT, bukan?
 Seperkara lagi, biarlah gambar-gambar yang kita ambil itu tidak mendedahkan aurat orang lain, atau mendedahkan aib mereka. Hmm, pasti kita tak nak dividen daripada saham buruk tu kan... Bayangkan, berapa ramai orang yang punya akses kepada gambar-gambar tu...
 Seperkara lagi, biarlah gambar-gambar yang kita ambil itu tidak mendedahkan aurat orang lain, atau mendedahkan aib mereka. Hmm, pasti kita tak nak dividen daripada saham buruk tu kan... Bayangkan, berapa ramai orang yang punya akses kepada gambar-gambar tu...
Wednesday, October 27, 2010
Photography 101: Macro Photography Tips Using compact cameras!
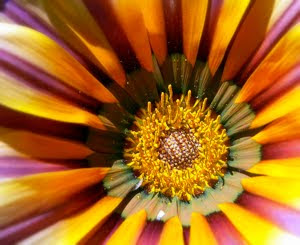
Now let us continue our venture in photography. =) We know the term 'macro photography', we love to look at the images of macro shots. But we were dissapointed that we could not achieve the same results of images as we do not own any DSLR camera with macro lenses. Worry no more as I will show you how you can create 'macro' feeling using your compact cameras only. But I want to stress here that the actual 'macro photography' means to capture the images of your subject (a bug etc.) at life size or bigger at 1:1 ratio. However, by using compact digital cameras only (with their small sensors and no macro lenses) we can only create 'close-up' photography which has the same 'macro' feeling, like this one.
This image above were taken using a compact camera only. So how can we achieve such image?

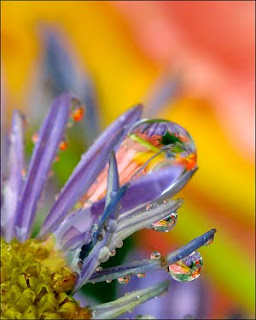

This image above were taken using a compact camera only. So how can we achieve such image?
- Select the correct mode - You must first select the Macro mode. Most people using the compact cameras never play with the modes on their cameras. Generally the macro mode is symbolise with a 'little flower' on cameras.
- Aperture - Most of the compact cameras do not allow you to switch the aperture, however if your camera allow this, select the desired aperture that suits you. Bigger aperture (marks with the smaller number such as 2.8) for shallow depth of field, which allows only your subject will be crystal clear and sharp, while your background will be blurred. If you compact cameras do not allow you to play with the aperture, just cool and stick to the macro mode. =P
- Use a tripod - Yep, use a tripod to get best results even tough you are using a compact camera only. This can help you minimise camera shakes that will ruin your image. Or if you do not own a tripod, you can just put your camera on a table or anything sturdy.
- Composing - Remember Rule of Thirds. Arrange your image so that it has a point of interest. If you are using an animal as your subject for close up, make sure its eyes are sharp.
- Flash - Use flash because macro photography needs a decent light to avoid the images from being dull. But if you are using you compact camera flash, try to diffuse the flash by placing a tissue or something to avoid harsh light. Or use a reflector instead to help you light your subject.
- Self-timer - Use your camera self timer to avoid camera shakes. =)

Don't forget to try this tips if you are interested in trying macro (read close-up) photography with your compact cameras. Let me know if you have anything to ask. =)
Friday, October 8, 2010
Photography 101: Missions! Get better using themes!
One tip that I learned to train yourself to be a good photographer is to do missions. Equip yourselves with a specific task - capturing images that has limitations. Limit your images to certain themes or concepts such as 'Cats', 'Green' or 'Light'; and let you and your lenses explore the concepts using your creative juice. For example, now I am on a mission to capture images of 'Still Life with Skies' and here are some of the images. Explore new themes as you move on. And most importantly, enjoy! (>o<)///


Sunday, October 3, 2010
Dave Hill's Effect and Story Behind an Image

I've been trying a few methods to gain a Dave Hill's effect on my portraits, and this one by far is my favourite method that I found. However, the photo that I used above to be applied with such effect was not good enough because of the absence of appropriate depth. I will try to apply the effect on better photo that has greater depth next time, insha ALLAH.

This photo above was not applied with the Dave Hill's effect. But I was fascinated with this image as (I thought) I managed to create a story or a situation that is related to the tittle that I gave to the image.
p.s: the portrait was me and my sister during the Idulfitri recently.
Monday, September 20, 2010
Photography 101: Long Exposure! =D


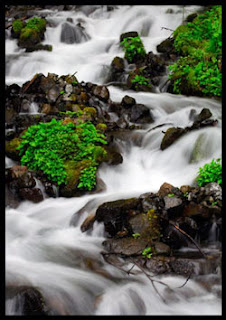
Saya akan menerangkan serba-sedikit tentang satu teknik fotografi yang pada hemat saya sangat jarang diterokai oleh penggemar fotografi di Malaysia iaitu long exposure. (Kali ini dalam Bahasa Melayu =)) Saya sangat meminati teknik ini yang mampu memaparkan situasi drastik, pergerakan imej, dan juga mistik, mengikut cara yang tertentu. Saya yakin ramai yang tahu teknik ini tapi tidak pernah terfikir nak mencubanya. Situasi drastik atau pergerakan imej boleh dicapai apabila mengambil gambar lanskap yang merangkumi awan yang bergerak, atau sungai yang mengalir, mahu pun trafik di waktu malam. Berikut adalah contoh gambar sungai yang saya ambil di Gunung Ledang, namun tidak begitu menarik komposisinya atas sebab-sebab teknikal yang akan saya terangkan nanti.
- Untuk mendapatkan gambar yang menarik menggunakan teknik long exposure, kita wajib mempunyai sebuah tripod untuk memastikan kedudukan kamera yang stabil. Gambar-gambar sungai yang saya ambil di atas tidak menggunakan tripod kerana tertinggal di Kedah masa ni. Jadi letakkan kamera atas apa-apa saja yang kukuh sebagai ganti. Gambar sungai ni tak menarik sebab tak saya compose dengan baik kerana meletakkan kamera di atas batu kecil betul2 di atas sungai, alhamdulillah tak jatuh. Hihi.
- Setkan kamera kepada mod Shutter atau Manual bagi mereka yang lebih profesional, hehe. Gunakan sekurang-kurangnya 8 saat untuk waktu pagi dan lebih lagi apabila mengambil gambar pada waktu malam. Gunakan ND grad filter pada waktu siang untuk mendapatkan efek yang lebih hebat.

- Edit secara digital untuk cropping dan blown out treatment dalam gambar tersebut sekiranya ada. Dalam gambar trafik di atas ada sedikit blown out kalau anda perasan.

Kalau gunakan teknik ni di tepi pantai pada waktu siang, akan menghasilkan satu efek mistik apabila ombak yang membasahi batu akan kelihatan seolah-olah seperti susu atau gas nitrogen mengikut setting dan penggunaan grad filter yang sesuai. Wallahualam.
Friday, July 2, 2010
Photography 101: How to Hold a Digital Camera? Really?
The most common problem (enemy!) with digital camera users is camera shake that will produce blurry images due to the camera not being held still enough. So to overcome this problem, the most basic thing that you need to know is how to hold YOUR digital camera during the process of taking a photo. Unwanted blurry images are more common when photographing in low light condition as the shutter speed is slower, as I explained before in my previous photography 101 on Shutter. Holding your digital camera still enough will help you to reduce camera shake hence avoiding unwanted blur. However, there is actually NO exact correct way to hold your digital camera, as digital cameras differ from each other, be it a DSLR, digital compact, digital ultrazoom, micro four thirds and so on. BUT, this is a method that is widely used and proven to reduce camera shake to the minimum level AND make you look like a Pro too! :)

- Ok, first of all, of course your right hand should grip the right-end of the camera. Put your index finger (forefinger) lightly on the shutter release (button on top to snap a picture). Put your thumb at the back of the camera, and your three other fingers around the front of the camera. You should put a strong grip on the camera, but not TOO strong that will result the camera to shake even more.
- Then your left hand should be positioned according to the type of digital camera that YOU are using, but the basic job for this left hand is to support the whole weight of the camera. So the left hand should be underneath the camera, or under/around the lens of your camera (if your camera has lens).
- Now if you compose your shot using a viewfinder, keep doing this as this method adds an extra stability to your camera as the camera is positioned close to your body. However, if your are using an LCD screen, make sure that you do not hold your camera too far away from you. You should tuck your elbows on your sides and hold the camera not further than 30 cm from your face. But if your camera has a viewfinder, I recommend you to use it if it is not a problem for you to look into it.
- For extra stability, you can always lean on sturdy walls or trees while taking photos. You can also practice this method of breathing. Compose your shot, take a deep breath, hold it, release the shutter, and exhale after that. I use this a lot, especially when taking macro photos. And one more thing, when you are taking photos, squeeze firmly on the shutter release, do not jab on it!

Keep practising and I believe your camera shake issue will be solved. However, you must bear in mind that there are other factors that lead to blurry images such as 'not knowing how to manipulate the shutter speed where you should be'. As for that, make sure what kind of shot that you want and set the shutter speed right. And invest on a tripod if your are serious. :)
Leave me a comment or any question that you want me to answer in the comment section below. Shown picture is taken from Nikonian Academy.
Photography 101: Shutter!
Ok guys, this is a new column that I looooooove to talk about. Under this entry label, I will talk to you all about camera, from types of camera, photography techniques, photography tips and tricks, anything A to Z about photography. Maybe I will do the same on videography and photomanipulation later (under different labels), so keep on reading in the future. :)
 Some cameras allow you to control the speed of the shutter to let you get creative with your images. The speed of a shutter is usually recorded in seconds but sometimes it can goes on for hours depending on your camera. As for my camera, it can go for as fast as 1/2000 seconds (that is one second divided into 2000 parts) and it can be as long as 60 seconds before the shutter shut itself. Faster shutter speed freezes the motion in an image, enable you to get sharp photos of a moving car or a water droplet in a glass; while slower shutter speed will produce milky images like this.
Oh yes, slower shutter speed will enables more light to come inside into the camera, which will help a lot in photographing in the dark or low light condition, however shakes while taking the photos are intolerable as this will results shaky (blurry) images. Got anything to ask? Just drop a comment below, I will answer them for you. :)
So for the first post under this photography 101 label, I will introduce you to certain terminologies used in photography. I will only explain these terms briefly as I will go deep into each of the terms in the future. So for the first term of the day, shutter. Shutter is a mechanical device on a camera that opens and closes to control the time of a photographic exposure on the films (as on film cameras) or image sensor (as on digital cameras). Confuse? Whenever you push the shutter button on a camera, the shutter is opened to let enough light to come inside and then the shutter is closed. The shutter looks a little bit like this in a camera.
 Some cameras allow you to control the speed of the shutter to let you get creative with your images. The speed of a shutter is usually recorded in seconds but sometimes it can goes on for hours depending on your camera. As for my camera, it can go for as fast as 1/2000 seconds (that is one second divided into 2000 parts) and it can be as long as 60 seconds before the shutter shut itself. Faster shutter speed freezes the motion in an image, enable you to get sharp photos of a moving car or a water droplet in a glass; while slower shutter speed will produce milky images like this.
Oh yes, slower shutter speed will enables more light to come inside into the camera, which will help a lot in photographing in the dark or low light condition, however shakes while taking the photos are intolerable as this will results shaky (blurry) images. Got anything to ask? Just drop a comment below, I will answer them for you. :)
Subscribe to:
Comments (Atom)